The documentation set for this product strives to use bias-free language. For the purposes of this documentation set, bias-free is defined as language that does not imply discrimination based on age, disability, gender, racial identity, ethnic identity, sexual orientation, socioeconomic status, and intersectionality. Exceptions may be present in the documentation due to language that is hardcoded in the user interfaces of the product software, language used based on RFP documentation, or language that is used by a referenced third-party product. Learn more about how Cisco is using Inclusive Language.
| Convention | Description |
|---|---|
| ^ or Ctrl | Both the ^ symbol and Ctrl represent the Control (Ctrl) key on a keyboard. For example, the key combination ^D or Ctrl-D means that you hold down the Control key while you press the D key. (Keys are indicated in capital letters but are not case sensitive.) |
| bold font | Commands and keywords and user-entered text appear in bold font. |
| Italic font | Document titles, new or emphasized terms, and arguments for which you supply values are in italic font. |
| Monospace font | Terminal sessions and information the system displays appear in monospace font. |
| Bold monospace font | Bold monospace font indicates text that the user must enter. |
| [x] | Elements in square brackets are optional. |
| . | An ellipsis (three consecutive nonbolded periods without spaces) after a syntax element indicates that the element can be repeated. |
| | | A vertical line, called a pipe, indicates a choice within a set of keywords or arguments. |
| [x | y] | Optional alternative keywords are grouped in brackets and separated by vertical bars. |
| Required alternative keywords are grouped in braces and separated by vertical bars. | |
| [x ] | Nested set of square brackets or braces indicate optional or required choices within optional or required elements. Braces and a vertical bar within square brackets indicate a required choice within an optional element. |
| string | A nonquoted set of characters. Do not use quotation marks around the string or the string will include the quotation marks. |
| Nonprinting characters such as passwords are in angle brackets. | |
| [ ] | Default responses to system prompts are in square brackets. |
| !, # | An exclamation point (!) or a pound sign (#) at the beginning of a line of code indicates a comment line. |
Means reader take note. Notes contain helpful suggestions or references to material not covered in the manual.
Means the following information will help you solve a problem.Means reader be careful. In this situation, you might do something that could result in equipment damage or loss of data.
Means the described action saves time. You can save time by performing the action described in the paragraph.
Means reader be warned. In this situation, you might perform an action that could result in bodily injury.
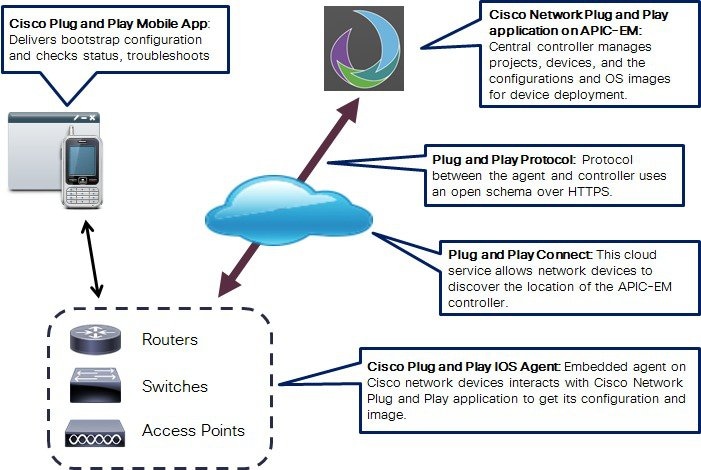
Enterprises and campus deployments incur major costs to install and deploy the large number of networking devices that go into their data center, branch networks and campus rollout. Typically, every device has to be pre-staged by a skilled installer and loaded, through a console connection, with a CLI configuration that allows it to connect to the rest of the network. This process is costly, time consuming, and error-prone. At the same time, customers would like to increase the speed and reduce complexity of the deployment without compromising the security. The Cisco Network Plug and Play solution provides a simple, secure, unified, and integrated offering for enterprise network customers to ease new branch or campus device rollouts or for provisioning updates to an existing network. The solution provides a unified approach to provision enterprise networks comprised of Cisco routers, switches, and wireless devices with a near zero touch deployment experience. It reduces the burden on enterprises by greatly simplifying the process of deploying new devices. An installer at the site can deploy a new device without any CLI knowledge, while a network administrator centrally manages device configuration. The Cisco Network Plug and Play solution offers these features:
The Cisco Network Plug and Play solution includes the following components:
This section describes workflows for the following typical use cases:
A prerequisite is an operating Cisco APIC-EM controller with the Cisco Network Plug and Play application.
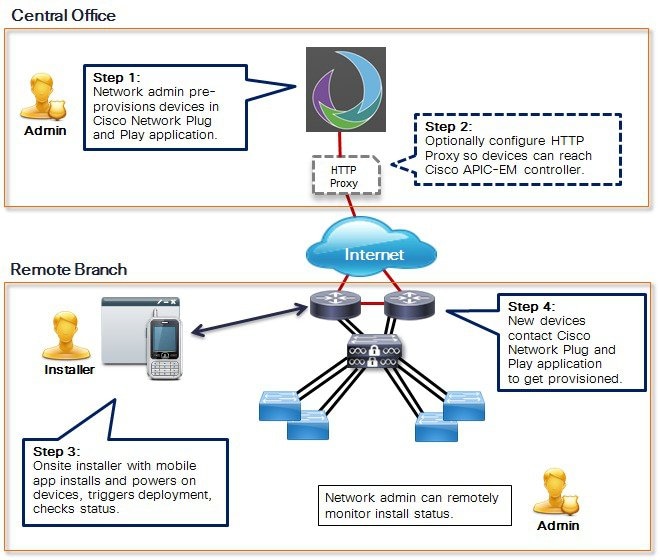
The following steps summarize how to use Cisco Network Plug and Play to deploy a Cisco network device in a remote branch or site.
Cisco network devices are running Cisco IOS images that support the Cisco Plug and Play IOS Agent.
On the APIC-EM controller, the network administrator uses the Cisco Network Plug and Play application to pre-provision the remote site and device information in the application.
This includes entering device information and setting up a bootstrap configuration, full configuration, and IOS image for each device to be installed. The bootstrap configuration enables the Plug and Play Agent and typically specifies the device interface to be used and configures a static IP address for it. For details on using the Cisco Network Plug and Play application, see the Configuration Guide for Cisco Network Plug and Play on Cisco APIC-EM .
(Optional). If the central network operations center is behind a DMZ, the network administrator should configure a generic HTTP proxy or a VPN link to the network operations center so that the Cisco Plug and Play IOS Agent in devices at remote sites can communicate with the Cisco Network Plug and Play application.
This is a one-time task, because once set up, the proxy or VPN can be used for all subsequent device deployments at remote sites. For details on setting up an HTTP proxy, see Generic HTTP Proxy Set Up.
At the remote site, the device installer installs and powers up the Cisco network device, then connects their mobile device to the console port of the Cisco network device with the special serial cable.
For Cisco wireless access point devices, the bootstrap configuration is not supported, so this step and the Cisco Plug and Play Mobile App is not needed.
The device installer uses the Deploy Devices function in the Cisco Plug and Play Mobile App to deliver the bootstrap configuration to the Cisco network device and trigger deployment. For details on using the Cisco Plug and Play Mobile App to deploy devices, see the online help in the mobile app.
You can also deliver the bootstrap configuration to a Cisco router or switch by using a USB flash drive, however, USB autoinstall is a platform dependent feature. For details on using a USB flash drive, see Overview of Cisco 800 Series ISR Deployment. For platforms that do not support USB (such as the Cisco Catalyst 2000 Series and 3000 Series switches), we recommend using the Cisco Plug and Play Mobile App.
The network device connects to the Cisco Network Plug and Play application on the APIC-EM controller, identifies itself by serial number, and downloads its full configuration and, optionally, an IOS image, which were pre-provisioned by the network administrator.
By using DHCP or DNS, Cisco network devices can automatically discover the APIC-EM and download their full configurations when powered on, and the Cisco Plug and Play Mobile App is not needed in such cases. Using DHCP requires that there is layer 3 connectivity to the Cisco APIC-EM controller and a DHCP server is configured with Cisco Network Plug and Play option 43. Alternately, the Cisco Plug and Play IOS Agent can find the Cisco APIC-EM controller by using DNS. Sometimes, these requirements are not met in a remote site deployment, so this use case focuses on using the Cisco Plug and Play Mobile App. For DHCP configuration details, see Configuring DHCP for APIC-EM Controller Auto-Discovery.
The following steps summarize how to use Cisco Network Plug and Play to deploy a Cisco network device in a campus or LAN, where network devices can auto-discover the Cisco APIC-EM controller.
Cisco switches are running Cisco IOS images that support the Cisco Plug and Play IOS Agent. If any switches are running older Cisco IOS images, you must use the SMI Proxy. For details, see SMI Proxy Set Up.
The network administrator sets up a DHCP server in the network to respond to client discover requests with DHCP option 43, which contains the APIC-EM controller IP address and port information.
Alternatively, DNS can be used to locate the controller. For DHCP and DNS configuration details, see Configuring DHCP for APIC-EM Controller Auto-Discovery.
The network administrator uses the Cisco Network Plug and Play application to pre-provision the remote site and device information.
This includes entering device information and setting up a bootstrap configuration (optional), full configuration, and IOS image for each device to be installed. The bootstrap configuration enables the Cisco Plug and Play IOS Agent and typically specifies the device interface to be used and configures a static IP address for it. For details on using the Cisco Network Plug and Play application, see the Configuration Guide for Cisco Network Plug and Play on Cisco APIC-EM .
The device installer installs and powers up the Cisco network device.
The device auto-discovers the APIC-EM controller by using DHCP or DNS, identifies itself by serial number to the Cisco Network Plug and Play application, and downloads its full configuration and, optionally, an IOS image, which were pre-provisioned by the network administrator.

In some cases, such as small sites or where pre-provisioning is not needed, devices can be deployed without prior set up on the Cisco Network Plug and Play application and then claimed and configured later.
The following steps summarize how to use Cisco Network Plug and Play to deploy a Cisco network device by using the unplanned device option.
The network administrator sets up a DHCP server in the network to respond to client discover requests with DHCP option 43, which contains the APIC-EM controller IP address and port information.
Alternatively, DNS can be used to locate the controller. For DHCP and DNS configuration details, see Configuring DHCP for APIC-EM Controller Auto-Discovery.
The device installer installs and powers up the Cisco network device.
The device auto-discovers the APIC-EM controller by using DHCP or DNS.
The device is listed as an unplanned device in the Cisco Network Plug and Play application, identified by IP address and product ID.
The network administrator uses the Cisco Network Plug and Play application to claim the device and configure it with a new configuration and IOS image.
For details on using the Cisco Network Plug and Play application, see the Configuration Guide for Cisco Network Plug and Play on Cisco APIC-EM .
In situations where automatic APIC-EM discovery is desired but using the DHCP or DNS discovery methods is not an option, Plug and Play Connect allows devices to discover the IP address of APIC-EM controller.
When the network device boots up, if it cannot locate the APIC-EM controller through DHCP or DNS, then it tries Plug and Play Connect by contacting devicehelper.cisco.com to obtain the IP address of the appropriate APIC-EM controller that is defined for your organization. To secure the communications, the first thing that the device does when contacting Plug and Play Connect is to download and install the Cisco trustpool bundle.
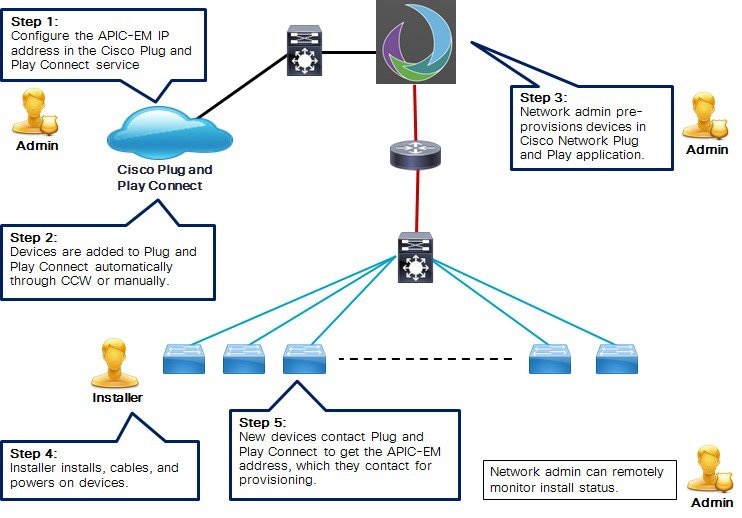
The following steps summarize how to use Cisco Network Plug and Play to deploy a Cisco network device by using Plug and Play Connect.
Cisco network devices are running Cisco IOS images that support the Cisco Plug and Play IOS Agent and have connectivity to the Cisco Plug and Play Connect service.
The network administrator configures the controller profile for the appropriate APIC-EM controller for your organization with Plug and Play Connect.
This can be done through the Cisco Smart Account, Plug and Play Connect web portal or through the Cisco Network Plug and Play application. For details, see the appropriate documentation.
If you order plug and play network devices through Cisco Commerce Workspace (CCW), these network devices are automatically registered with Plug and Play Connect as long as a Cisco Smart Account is assigned to the order and you include the NETWORK-PNP-LIC option for each device that you want to use with Cisco Network Plug and Play.
This option causes the device serial number and PID to be automatically registered in your Smart Account for plug and play. If you have specified a default controller, then the devices are automatically assigned to that controller when the order is processed.
If you want to be able to manually add other devices in Plug and Play Connect, you can request access to this functionality by sending an email to Pnp-access-request@cisco.com.
When you manually add a device in the Plug and Play Connect web portal, you can optionally associate the device with a configuration or configuration template that you have uploaded to the web portal by using the Configurations or Configuration Templates tabs. The configuration is applied to the device when it contacts the Plug and Play Connect web portal.
This feature is in Beta release and can be used with Cisco network devices that support SUDI. You must enter the SUDI serial number of the device in the Plug and Play Connect web portal. You cannot use this feature of defining a configuration in Plug and Play Connect at the same time as redirecting devices to your own APIC-EM controller.
In the Cisco Network Plug and Play application in the APIC-EM controller, click the Settings tab, choose Smart Accounts and register your APIC-EM as the default controller for your Smart Account.
This step is required if you order plug and play network devices through CCW and these network devices are automatically registered with Plug and Play Connect through your Smart Account. For details on using the Cisco Network Plug and Play application, see the Configuration Guide for Cisco Network Plug and Play on Cisco APIC-EM.
In the Cisco Network Plug and Play application in the APIC-EM controller, choose the Devices > Cloud Synced tab, and click the Sync button.
Devices registered in the Plug and Play Connect web portal are synced to the controller, appear in the list, and can be moved to a project by selecting them and clicking Move to Project.
This step is not necessary for devices that you have manually added and associated with a configuration as described in Step 4.
Pre-provision the devices by going to Projects, choosing the project, and editing the newly added devices to assign a configuration and image.
You can assign a bootstrap configuration (optional), full configuration, and IOS image for each device to be installed. The bootstrap configuration enables the Cisco Plug and Play IOS Agent and typically specifies the device interface to be used and configures a static IP address for it.
This step is not necessary for devices that you have manually added and associated with a configuration as described in Step 4.
The device installer installs and powers up the Cisco network device.
The device discovers the APIC-EM controller by querying the Plug and Play Connect service, then identifies itself by serial number to the Cisco Network Plug and Play application, and downloads its full configuration and, optionally, an IOS image, which were pre-provisioned by the network administrator.
The device will fail to contact Plug and Play Connect if the device cannot synchronize with the predefined NTP servers time-pnp.cisco.com or pool.ntp.org. To resolve this problem, either unblock NTP traffic to these two host names, or map these two NTP host names to local NTP server addresses on the DNS server.
This section discusses deploying the Cisco Network Plug and Play solution.
The following are prerequisites for using the Cisco Network Plug and Play solution:
The Cisco Plug and Play Mobile App is not used for deploying Cisco wireless access point devices and is optional for other devices.
Follow these recommendations when deploying the Cisco Network Plug and Play solution:
If the upstream router is a Cisco 4000 Series ISR router, this functionality is impacted by caveat CSCut77951 , which is resolved in software release 15.5(3)S4.
When using the non-VLAN 1 feature, ensure that all the neighboring switch devices are running Cisco IOS XE Release 3.6.3 or later, and not the 3.6.0, 3.6.1, or 3.6.2 releases. For more information about related caveat CSCut25533 that exists in these previous releases, see the Caveats section in the Release Notes for Cisco Network Plug and Play .
During Cisco Network Plug and Play configuration provisioning, the configuration file is applied to the running configuration of the device. If the device is using Virtual Route Forwarding (VRF), or it has multiple IP interfaces in the final configuration, the source IP address used to contact the APIC-EM controller could change after the final configuration is applied. This IP address change could result in the loss of connectivity to the controller and the device status will show a provisioning error because the controller fails to receive a successful response from the device.
For example, for a router deployment, the initial source IP address that the router uses to contact the APIC-EM controller is its WAN IP address. After the controller pushes the configuration to the router, the router could use any IP address (such as the tunnel IP address) to contact the controller. If there is no IP connectivity from the tunnel IP address to the controller, it will cause a health check error on the controller.
To avoid this issue, use the ip http client source-interface interface command in the final provisioning configuration. Since the plug and play protocol uses HTTP/HTTPS, this command tells the device to use the same interface for a response as was initially used for contacting the controller before configuration provisioning, regardless of VRF. For a router deployment scenario, you can specify the same WAN interface as the source interface.
The Cisco Network Plug and Play solution uses HTTPS connections between network devices and the APIC-EM controller. This secure connectivity is implemented in one of two ways, depending on the type of transport you specify in the DHCP option. For details on configuring DHCP, see Configuring DHCP for APIC-EM Controller Auto-Discovery.
Depending on the transport specified in the K parameter in the DHCP option 43 string, secure connectivity is implemented in the following ways:
You can choose to host the trustpool bundle in a different location in your network, which you can specify in the T parameter to DHCP option 43. In this case, network devices would obtain your trustpool bundle instead of the default one that is installed in the APIC-EM.
For more details on security, importing certificates, and the trustpool bundle, see the “Cisco APIC-EM Security” chapter in the Cisco Application Policy Infrastructure Controller Enterprise Module Deployment Guide .
Some of the next generation of Cisco network devices (such as the Cisco ISR 4000 Series routers) support secure device identification and authentication using a secure unique device identifier (SUDI) certificate that is factory installed in the device hardware. The device sends this SUDI certificate to the APIC-EM controller during the SSL handshake. You can specify that the APIC-EM controller must validate the SUDI certificate to authenticate the device.
To require SUDI authentication on devices that support it, check the Authentication check box next to the device listed in the Projects tab of the Cisco Network Plug and Play application. If you check this box for a device that does not support SUDI authentication, then authentication and provisioning fails with an authentication error and you should uncheck the box to continue with the device. For details, see the Configuration Guide for Cisco Network Plug and Play on Cisco APIC-EM.
Devices that support SUDI have two serial numbers: the chassis serial number and the SUDI serial number (called the License SN on the device label). You must enter the SUDI serial number in the Serial Number field when adding a device that uses SUDI authentication.
For a list of devices that support SUDI authentication, see the Release Notes for Cisco Network Plug and Play.
The Cisco Plug and Play Mobile App (iOS or Android version) can be used by the device installer to help configure Cisco devices with a bootstrap configuration and trigger remote branch deployments, if auto-discovery of the APIC-EM controller is not possible. The mobile app communicates with the Cisco Network Plug and Play application over 3G/4G/WiFi connections to get the predefined device bootstrap configuration, and delivers it to a Cisco network device by using a special cable that is physically connected to the device console port.
The mobile apps are available at the following app stores:
The Cisco Plug and Play app for iOS requires iOS version 7 or later. The Android app requires Android version 4.1 or later.
The Cisco Plug and Play Mobile App is not used for deploying Cisco wireless access point devices.
The following console cable is needed, depending on whether the device is an iOS or Android device:
After disconnecting the console cable from the network device, if you want to connect it to a different network device, you must first manually refresh the mobile app to reflect the correct status when connecting to the new device.
If you have an iOS mobile device with a Redpark cable and are deploying multiple network devices, after you are done with one device, you must unplug the Redpark cable from both your mobile device and the network device to close the serial connection. If you do not disconnect the cable from your mobile device, the serial session is not closed and the wrong configuration could be deployed on the next device.
Before using the Cisco Plug and Play Mobile App for the first time, you must configure it with the URL and credentials for the APIC-EM controller. These settings are saved once set up.
To set up the controller information, follow these steps:
Launch the Cisco Plug and Play Mobile App and choose Settings from the menu.
In the Server URL field, enter the IP address of the APIC-EM controller.
In the Username and Password fields, enter the username and password credentials for an APIC-EM user account that has the installer role.
For details on setting up user accounts and roles, see the chapter “Managing Users and Roles” in the Cisco Application Policy Infrastructure Controller Enterprise Module Configuration Guide .
Tap Test Connection to test the controller connection and show the status.
If the connection is successful, tap Save in the upper right corner, then Done in the upper left corner, to return to the main screen.
The Smart Install (SMI) Proxy leverages Smart Install functionality that exists in Cisco switches that have older IOS versions without the new Cisco Plug and Play IOS Agent (older than IOS-XE 3.6.3E and IOS 15.2(2)E3). SMI Proxy acts as a proxy between the switches and the Cisco Network Plug and Play application using the newer plug and play protocol.
The SMI proxy is applicable only to switching platforms that support Smart Install Director functionality and is not supported on routing platforms.
For details on configuring SMI Proxy, see the “Configuring SMI Proxy” chapter of the Smart Install Configuration Guide .
Customers should consider upgrading to newer IOS images to get full benefit of the Cisco Network Plug and Play Solution. The SMI Proxy does not provide all of the capabilities of the newer Cisco Plug and Play IOS Agent and it should be considered only as an interim solution until deployment of an IOS image with the newer Cisco Plug and Play IOS Agent.
If the remote network devices to be deployed need to contact the APIC-EM controller by using the public Internet, and the controller is behind a DMZ, a generic HTTP proxy must be installed in the network so that the network devices can contact the APIC-EM controller. A generic HTTP reverse proxy, such as the Apache reverse proxy, can be placed before the APIC-EM controller in the DMZ, to relay messages between network devices and the APIC-EM controller.
To use a reverse proxy, the same certificate from a well known certificate authority (CA) must be installed on the Apache HTTP proxy server, the APIC-EM, and the network device that is being deployed. The certificate allows all devices to establish trusted communications. The APIC-EM controller installs the certificate on the network device.
To import the certificate on the APIC-EM, use the Settings > Proxy Gateway Certificate GUI command as described in the chapter “Configuring the Cisco APIC-EM Settings” in the Cisco Application Policy Infrastructure Controller Enterprise Module Deployment Guide .
Cisco recommends against using and importing a self-signed certificate into the controller. Importing a valid X.509 certificate from a well-known, certificate authority (CA) is recommended.
The Cisco Network Plug and Play solution has been tested with Apache HTTP Server version 2.4.7 on Ubuntu. The following lines from the Apache configuration file show an example of how to enable the reverse proxy in Apache. Substitute the IP address of the APIC-EM controller in place of APIC-EM-ip-address in the commands below:
ProxyRequests Off ProxyPreserveHost On ProxyPass / http://apic-em-ip-address / ProxyPassReverse / http://apic-em-ip-address / ServerName your-server-name ServerAdmin webmaster@localhost SSLCertificateChainFile /etc/apache2/sites-available/Your-IntermediateCA-file.crt DocumentRoot /var/www/html ErrorLog $/error.log CustomLog $/access.log combined SSLProtocol ALL ErrorLog $/error.log CustomLog $/access.log combined SSLEngine On SSLCertificateFile /etc/apache2/sites-available/your-certificate-file.crt SSLCertificateKeyFile /etc/apache2/sites-available/your-certificate-key-file.key SSLProxyEngine On SSLProxyVerify none SSLProxyCheckPeerCN Off SSLProxyCheckPeerExpire Off SSLProxyCheckPeerName Off SSLProxyProtocol all -SSLv2 Order allow,deny Allow from all ProxyPreserveHost On SSLOptions +StdEnvVars SSLOptions +StdEnvVars BrowserMatch "MSIE [2-6]" \ nokeepalive ssl-unclean-shutdown \ downgrade-1.0 force-response-1.0 BrowserMatch "MSIE [17-9]" ssl-unclean-shutdown
Refer to this section for common self-help topics or issues that may come up during deployment.
If you purchased this product through a Cisco reseller, contact the reseller directly for technical support. If you purchased this product directly from Cisco, contact Cisco Technical Support at this URL: http://www.cisco.com/c/en/us/support/web/tsd-cisco-worldwide-contacts.html
For details on troubleshooting the APIC-EM controller, see the troubleshooting chapter in the Cisco Application Policy Infrastructure Controller Enterprise Module Deployment Guide .
You can check the Cisco Network Plug and Play application status in the APIC-EM GUI by going to the Home screen and clicking on Network Plug and Play in the left navigation pane. If the application is running, it will open.
You can view logs on the Cisco Network Plug and Play application by going to the Home screen and clicking on Logs in the left navigation pane. In the Service drop-down menu, choose pnp-service to filter on logs only for the Cisco Network Plug and Play application.
You can reset the provisioning status of a network device if its state gets out of synchronization with the status shown in the Cisco Network Plug and Play application. Select the device in the Sites tab and click the Reset button, then click OK in the confirmation dialog. Resetting a device causes it to go through the provisioning process again. It recontacts the APIC-EM controller and downloads its full configuration and, optionally, an IOS image.
The Cisco Plug and Play Mobile App requires 3G/4G/WIFI connectivity to the APIC-EM controller to retrieve the bootstrap configuration file for a device.
The app can also be used in offline mode for bootstrap delivery, if it was previously connected to the controller and a bootstrap configuration was delivered to a device. The bootstrap configuration file stays in the app and can be used again for offline delivery to the same type of device.
The Cisco Plug and Play Mobile App keeps detailed logs on app operations and serial connection interactions. You can view or email logs by choosing Troubleshooting from the main screen, then View Logs or Email Logs .
Cisco network devices to be deployed must be in a factory default state. If you are using a network device that was previously configured or is in an unknown state, you must reset it to the factory default condition, as follows:
config terminal no pnp profile pnp-zero-touch no crypto pki certificate pool config-register 0x2102 (for non-default ROMMON only) end delete /force vlan.dat (for Switch platforms only) delete /force nvram:*.cer delete /force stby-nvram:*.cer (for HA system only) write erase (answer no when asked to save) reload
debug capwap console cli config terminal no crypto pki certificate pool boot system flash:/ap3g2-rcvk9w8-mx/ap3g2-rcvk9w8-mx (for 3700, 2700, 1700, 3600, 2600 platforms) boot system flash:/ap1g2-rcvk9w8-mx/ap1g2-rcvk9w8-mx (for 1600 platforms) boot system flash:/ap1g1-rcvk9w8-mx/ap1g1-rcvk9w8-mx (for 700 platforms) end clear capwap private-config delete /force flash:capwap* delete /force flash:private-multiple-fs delete /force flash:lwapp* write erase reload
capwap ap erase all reload
IP connectivity between the Cisco Plug and Play IOS Agent in the Cisco network device and the APIC-EM controller is required. Ensure that the network device is able to ping the APIC-EM controller.
You can view active connections for the Cisco Plug and Play IOS Agent as follows:
Router# show pnp tech-support
If needed, you can enable debug information and capture the output for the Cisco Plug and Play IOS Agent as follows:
Router> enable Router> debug pnp all Router> ter mon
You may also want to use the debug cns all command to capture additional debug information about the Cisco Networking Service (CNS). This command typically produces a lot of output, so ensure that you have a large enough log buffer.
See the Cisco Open Plug-n-Play Agent Configuration Guide for detailed help with any of the commands related to the Cisco Plug and Play IOS Agent.
Devices can automatically discover the APIC-EM controller through DHCP, DNS, a proxy server, or the cloud through Plug and Play Connect. This section contains the following topics related to controller discovery:
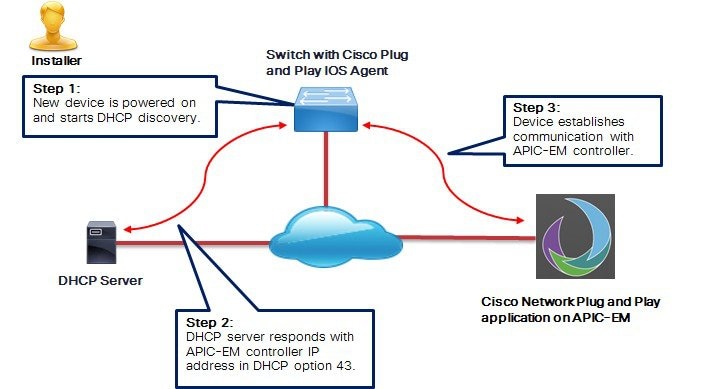
A Cisco network device with no startup configuration triggers the Cisco Plug and Play IOS Agent to initiate a DHCP discovery process, which can acquire the APIC-EM controller IP address from the DHCP server. This auto-discovery process requires that the DHCP server be configured with the vendor specific option 43 that contains additional information about the APIC-EM controller.
When the DHCP server receives a DHCP discover message with option 60 that contains the string “ciscopnp”, it responds to the device by returning a response that contains the option 43 information.
The Cisco Plug and Play IOS Agent extracts the APIC-EM controller IP address from the response and uses this address to communicate with the controller.
The prerequisites for the DHCP auto-discovery method are as follows:
DHCP option 43 consists of a string value that is configured as follows on a Cisco router CLI that is acting as a DHCP server:
ip dhcp pool pnp_device_pool
The option 43 string has the following components, delimited by semicolons:
See the Cisco IOS Command Reference for additional details on DHCP configuration.
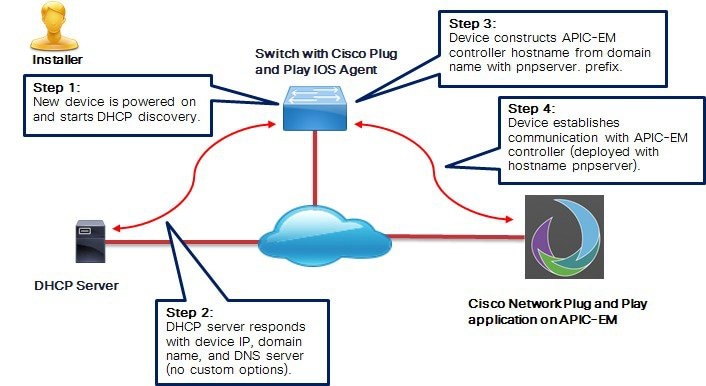
If DHCP discovery fails to get the IP address of the APIC-EM controller, for example, because option 43 is not configured, the Cisco Plug and Play IOS Agent falls back on a DNS lookup method. Based on the network domain name returned by the DHCP server, it constructs a fully qualified domain name (FQDN) for the APIC-EM controller, using the preset hostname pnpserver. The NTP server name is based on the preset hostname pnpntpserver.
For example, if the DHCP server returns the domain name “customer.com”, the Cisco Plug and Play IOS Agent constructs the APIC-EM controller FQDN of pnpserver.customer.com. It then uses the local name server to resolve the IP address for this FQDN. The NTP server name FQDN would be pnpntpserver.customer.com.
The prerequisites for the DNS auto-discovery method are as follows:
To ensure successful controller discovery by Cisco devices running newer IOS releases, the server SSL certificate offered by the controller during the SSL handshake must contain an appropriate Subject Alternate Name (SAN) value, so that the Cisco Plug and Play IOS Agent can verify the server identity. This may require the controller administrator to upload a new server SSL certificate, which has the appropriate SAN values, to the controller. This requirement applies to all controllers that implement the Plug and Play server.
This requirement applies to devices running the following Cisco IOS releases:
The value of the SAN field in the controller certificate must be set according to the type of discovery being used by devices, as follows:
If the controller IP address that is used in the Plug and Play profile is a public IP address that is assigned by a NAT router, then this public IP address must be included in the SAN field of the server certificate.
If an HTTP proxy server is used between the devices and the controller, ensure that the proxy certificate has the same SAN fields with the appropriate IP address or hostname.
It is recommended to include multiple SAN values in the certificate, in case discovery methods vary. For example, you can include both the controller FQDN and IP address (or NAT IP address) in the SAN field. If you do include both, set the FQDN as the first SAN value, followed by the IP address.
If the SAN field in the controller certificate does not contain the appropriate value, the device will not be able to successfully complete the plug and play process.
The Cisco Plug and Play IOS Agent checks only the certificate SAN field for the server identity. It does not check the common name (CN) field.
For information on obtaining documentation, using the Cisco Bug Search Tool (BST), submitting a service request, and gathering additional information, see What's New in Cisco Product Documentation.
To receive new and revised Cisco technical content directly to your desktop, you can subscribe to the What's New in Cisco Product Documentation RSS feed. RSS feeds are a free service.